Whether you want to save a funny meme, capture an important document, or record a bug for work, knowing how to screenshot on Mac is essential. Mac computers offer multiple ways to capture your screen, each tailored to different needs. In this guide, we’ll break down the most efficient methods so you can take screenshots like a pro—no tech expertise required.
Why Knowing How to Screenshot on Mac Matters
Screenshots are more than just a convenience—they’re a productivity tool. Whether you’re a student, professional, or casual user, capturing your screen helps:
- Share information quickly
- Save proof of transactions or messages
- Create tutorials or guides
- Highlight errors for tech support
By learning the built-in shortcuts and tools, you’ll save time and work smarter.
Mac Screenshot Shortcuts You Should Know
Mac computers come with several easy-to-use keyboard shortcuts. Here’s a breakdown:
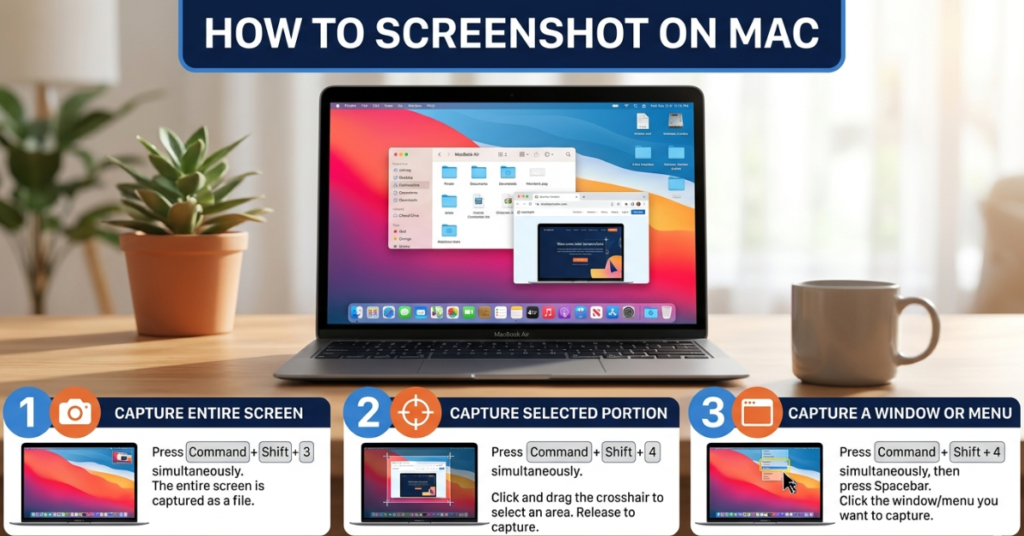
1. Capture the Entire Screen
- Press Command (⌘) + Shift + 3.
- The screenshot will automatically save to your desktop.
- Pro tip: Hold Control while pressing the shortcut to copy the screenshot to the clipboard instead of saving it.
2. Capture a Selected Portion
- Press Command (⌘) + Shift + 4.
- Your cursor will turn into a crosshair. Drag to select the area you want to capture.
- Release the mouse or trackpad to take the screenshot.
3. Capture a Specific Window
- Press Command (⌘) + Shift + 4, then press Spacebar.
- Your cursor will turn into a camera icon. Click the window you want to capture.
- The screenshot will include the window with a neat shadow effect.
4. Use the Screenshot Toolbar MacOS Mojave and later
- Press Command (⌘) + Shift + 5 to open the screenshot toolbar.
- Options include capturing the entire screen, selected portions, specific windows, or even recording your screen.
5. Screenshot Touch Bar If Available
- Press Command (⌘) + Shift + 6 to capture the Touch Bar content.
- Great for MacBook Pro users who need to document Touch Bar actions.
Where Screenshots Are Saved
By default, screenshots are saved to the desktop with the filename format: Screen Shot [date] at [time].png. You can:
- Drag and drop them into folders
- Open them in Preview for quick edits
- Use Photos or Notes for organization
Tip: If you want to change the default location, use the Screenshot Toolbar (Command + Shift + 5) → Options → Save To.
FAQs About Mac Screenshots
Q1: Can I take screenshots without saving them?
Yes! Hold Control while using any screenshot shortcut to copy the image to the clipboard instead of saving it.
Q2: How do I annotate a screenshot on Mac?
Double-click the screenshot to open it in Preview, or use the Markup toolbar in Finder or Mail to add text, shapes, or highlights.
Q3: Can I take screenshots on older MacOS versions?
Absolutely. The keyboard shortcuts (Command + Shift + 3/4) work on most versions, though the screenshot toolbar is only available in MacOS Mojave and later.
Q4: Is there a faster way to capture screenshots regularly?
Yes! Use Hot Corners in System Preferences → Desktop & Screen Saver → Hot Corners to trigger screenshots with a simple mouse gesture.
Conclusion
Knowing how to screenshot on Mac makes life simpler, whether for work, school, or personal projects. By mastering keyboard shortcuts, the screenshot toolbar, and optional features like the Touch Bar capture, you’ll save time and improve productivity.